Welcome to Cards by Amy K.

I am SO GLAD you stopped by to check out my blog!!! Here I will be posting my current projects for you to see. PLEASE feel free to leave me a comment. I would LOVE to hear what you think about what I'm working on. I have been a scrapbooker/paper crafter since I first caught wind of this wonderful hobby in 2006. I am lucky enough to get to spend my days doing something I love so much and which brings so much joy into my life. I first started scrapbooking as a way to pass the time as I found myself at home alone all day suddenly, now I can't imagine life without it. Too bad I don't get paid for it, then I really would have it all!!!


Wednesday, June 11, 2014

Happy Anniversary card made for my Friend, Robin and husband, Denny

This is the anniversary card I made for my good friend, Robin and her husband, Denny.  They are great people and are truly happy together.  They have a wonderful family who are all very close to one another.  I hope I have the kind of success in my marriage that they have experienced.  I won't go into great detail about how the card was made but I will say that it was very easy to put together in no time at all.  I used printable papers from Kitty's Scrap Post on etsy, and just added some flowers and a little bling and a stamped sentiment.   It really did go together fast.  I think that the papers are so beautiful that you don't have to add alot to the projects you use them on because the papers stand alone.  I really love her printables and the best thing is if you run out of one pattern you can just reprint it again and in any size you like.  I think I really like this card and I hope Robin and Denny enjoyed it as well.  I wish them both all the best in a long happy marriage. 

That's all for today, hope you enjoyed the card share.  I hope to be back tomorrow with another anniversary card.  Till then, I hope you all are having a wonderful day and at least the week is halfway over. Yeah for that!  Right now my Hubbs is working 4, 10 hr shifts at work and that means Friday thru Sunday I have him here will me all to my self.  It's good to have him around so much lately, even though I know the long hours are hard on him.  At least he gets 3 days to relax and recharge, (that is if he didn't have so much around here that needs to be done while he's home).  So my weekend starts on Thursday night. so I just have one more day till my weekend starts. Yeah. I live for the weekends. lol. I hope you all are blessed in some way today and everyday do something nice for someone else. You never know when you may be a blessing to someone who really needs it.  Talk to you tomorrow., till then, Hugs, and lots of love, AmyK

Tuesday, June 3, 2014

Card made for my good friend, Robin

My good friend, Robin, had a birthday last month and I want to show you the card I made and sent to her.  She and I have never met in person, oddly enough, but that hasn't stopped us from becoming good friends over the past few years.  We enjoy talking on the phone and swapping crafty ideas and we always keep up with hand made cards made for each other during birthdays and anniversaries and sometimes just to say hello.  She really has come to mean a great deal to me and I can't imagine life without her.  I wouldn't want to.  She's smart and funny and very sweet.  We met thru a swap done on You tube.  We just happened to be partners for that swap and it was the first swap I had ever done all tho she was a seasoned veteran. So I'll quit running my mouth and show you the card now. 


Here's what the front of the card looks like. I finally got to use some of that wonderful mesh bling I got.  (which I was happy to share with Robin cause that''s just how we roll lol).  

And here's the inside of the card.

you can see I used the same punch for the sentiment both on the front and the inside and all that gold is from my Krylon gold leaf pen.  Love that pen and it has lasted a long time.  I also used those 5.5x5.5" corrugated card bases that I get at Micheal. Another one of my favorite products right now.  In fact, I'm starting on my second box right now.  Hope they don't discontinue them anytime soon.

Okay, that's my card share for today.  Hope you all enjoyed it.  Also, I hope you are liking the new shorter blog post.  I will keep it up unless I start getting alot of questions about products used.  Remember I will be happy to share that information with you if you will just leave me a comment.  I will see you all back here tomorrow for another card share. Till then I hope you have a wonderful and crafty day.  Much love and hugs, AmyK


Monday, June 2, 2014

More cards for the church

From now on I'll be trying to keep my blog post shorter with the hopes that people may actually read it and not just look at the pictures lol.  I know it's alot of information for me to tell you the process so from now on I'll give that information out to anyone who wants to leave me a comment and ask.  Feel free to ask me anything you would like to know about products used or techniques used.  If I do a special technique I'll probably explain the process or tell you where to find that information.  So, I hope that you like this style much better and please feel free to leave me a comment and let me know what you think.


This is one of the Thank You for Visiting cards.  It's to give to first time visitors of the church.  We'll have another/different postcard type card to give to second time visitors and so on.  It's up to the preacher who will be getting these cards and how many they will give.  I just make however many he tells me he needs that week.  This week he needed two so that's the two cards I'm showing today.  I don't make many one layer cards so this was a little bit of a challenge but like I've said before, It's good to flex those creative muscles.  I will admit this one took a couple of trys to get it just right but I'm happy with the outcome. 


Here's a shot of the inside of the card with the quote on one side and a place for the preacher to sign on the other side.


This is the second Thank you for Visiting card I made this week.  I will tell you one thing about how I did this:  I used an actual page from a hymnal and just photocopied it and used the copy to make the card.  When I do something like that I almost always print onto card stock instead of printer paper.


This is the inside of that card and it's laid out in the same format as the first card and I believe it uses the same quote and then has room for him to sign on the right. 

Okay, that's the two cards for today.  Hope you enjoyed the shorter post.  I know I did lol.  I hope you all are having a wonderful Monday.  I'll be back tomorrow with another card for you.  Till then, much love and hugs, Amy K.


Saturday, May 31, 2014

Some Handmade cards for the Church this week


Here are the cards I've made for last week at the church.  This first card is a Get Well soon card.  I'm not sure who this card will be going out to so I can't give you that information.  I guess whom ever is on the prayer list and the pastor thinks it will benefit the most.  I hope who ever gets it that it will brighten their day.

For this card I used a patterned paper 6x6" stack by My Minds Eye called Reunion.  I think this is an oldie but a goodie. lol.  I used a couple of Spellbinders dies.  The dollie die out of the black paper is from the set called Lacey Circles and the frame is from the Classic Frames set.  On it I used some Hero Arts ink in Green.  For the sentiment I used the Sizzix die called Styled Labels and used the same green ink to stamp out the first part of the sentiment and some more Hero Arts ink in orange for the second part and I used that same ink to distress around the edges of the manila card stock.  That sentiment is from Papertray Ink called Big & Bold Wishes.  The two little flowers on the end are also from the Spellbinders Classic Frames die set. Then I added some dew drops in orange.  This color pallet is a little out of my norm but I think it's good to flex your creative muscles from time to time.  I know I am guilty of getting in a comfort zone and it's easy to stay there and I don't think you can grow as an artist that way.  You have to always stretch your imagination and try new things.  I look at it like this, I can always fall back on what I know if something new doesn't work out alto I almost never throw any part of my project away and start over.  I almost always find a way to make what ever I've done work.  I don't know, I almost feel like it's wasteful to throw away something just because it's not perfect.  I know I've got plenty of supplies but that's not the point.  I think my husband would die if he thought I was throwing away something that I could easily fix.  These things we make as crafters and artist are handmade and that means that not every one will look the same and they won't all be perfect.  I'm glad for that.  One thing that I think is always true, however, is that you will be getting a quality product when you get something that's handmade.  I know I make my cards to last.  That's why I hate using hot glue on them because over time it becomes brittle and will fall apart.  I know some of my family members have saved all the cards that I've made them and that's so cool.  I would hate if they went to look at them years later and they started falling apart and they had to throw them away.  That's not very cool.

So, On to the second card.....

This second card is also a Get Well Soon card.  I used several die cuts for this card.  I started with paper from g.c.d. studio made with Donna Salazar.  I think she's so very cool. The patterned paper pack is called Botanique.  I used some texture paste that I colored with some reinker in Salty Ocean blue by Tim Holtz and used it with a stencil from Prima for that cracked design.  The I used the Tattered Flourals die from Sizzix to make the flower in the top corner.  I made that flower out of some muslin fabric that I first used some stiffener on then die cut and used my glimmer mist to color. The flower center is made by me out of clay that I used a button to make a mold of so that I could have an endless supply of that design. I used the Viva Decor Inka Gold Metallic Rub to color it. The label shape in the bottom corner is a Spellbinders die called Labels 22.  I colored it while it was still in the die after die cutting with some Lindy's Stamp Gang mist. I then cut out the Dizzy Dolly Duo die from My Favorite Things in blue card stock and layered it over top of the label die. I finished it off with the Elegant Flourishes die from Sizzix cut from some Metallic brown card stock from Bazzill.  Love it every chance I get to use that die. :)  And I finished the card off with some pink dew drops made from pony beads.

Here's the last card....

This card was a favorite with my husband, (all cards must first be approved by my husband lol) along with the people at church.  It's a Thinking of You card.  I also used another Oldie but Goodie paper line on this card.  It's made using the Nature's Garden from Prima  I started off with the 5.5x5.5" card base from Micheals and then distressed all the edges of the patterned paper, tip: I use my dremel tool to do this.  Then I used distress ink on all edges in Gattered twigs.  I used that Styled Labels die again here on this card for the sentiment which is a Close to my Heart stamp set called Gracious Greetings and heat embossed it with a metallic purple embossing powder.  I used another MFT's die called Fancy Flourishes in the dark purple card stock and a Prima flower in burlap that I colored using some Lindy's Stamp Gang spray that was applied using a paint brush to get in just where I wanted it. I finished off the card with some vintage crocheted lace from my stash.  

I know this was a long blog post and I hope you stayed till the end.  To those who did I thank you.  I really am enjoying making these cards for the church and I hope they are enjoying it too.  It's going to really get me some good practice in. lol.  I have to go for now and I guess you will see me back here Monday as I am taking tomorrow off.  I will be very busy next week as we have Homecoming at the church Sunday and then all next week I'm teaching Vacation Bible School.  That will be a first time experience for me so please keep me in your prayers.  I wouldn't want to misguide one of our children. I will try to keep up with my blogging all week though.  We shall just see how it goes. I'll see you back here Monday.  Hope you have a wonderful weekend.  Till then, Much love and hugs, Amy k


Friday, May 30, 2014

Mother's Day card share


Every year I have only two Mother's Day cards to make.  Thank goodness, I wouldn't ever want another one. I love the two Mothers that I have with all my heart. They are seriously two amazing women.  Both my mother and my mother in law have shown tremendous strength in dealing with death and divorce and suddenly being thrust into life and find themselves alone and having to bear the weight of the world alone.  I can't imagine what it has been like for each of them but Mom is doing alright after my Dad's death and mother in law, Judy has sense moved on to find happiness with a new man and they've just celebrated another anniversary this month and still say they've yet to have a fight.  Isn't that amazing? I mean, my husband and I don't really fight but I can't say that we've NEVER had a fight.  I mean, come on, we're only human and we've been together like 16 years.  A person is bound to have one bad day in that amount of time, right?  I can believe they've never fought because they are so respectful of each other.  My mom has had to take on a second job to support herself but she's also in the middle of renovating her basically whole house and only with the help of my husband, a close friend of ours and one contractor and her brother helped a bit.  It's taken us a while to get it done but we're slowly seeing progress and hopefully will have it done by the end of the year.  Finger's crossed.

I also want to say to all my family that read this either here or on Facebook, that due to the amount of cards that I'm now making for the church, I will no longer be able to send hand made cards to each of you for birthday's and anniversaries like I've been doing for several years now. I'm sorry but I just don't have the energy with my being disabled and all.  I have loved making cards for each of you and I appreciate you letting me get my practice in on you guys.  From this new month of June forward, the only way you will be receiving a hand made card from me will be if you attend Fishers Chapel or maybe for Christmas.  I haven't decided about that yet. . I will also be making Mother's day and Father's day cards for you guys. Once again, I am sorry that I've had to make this very hard decision but I wanted to give you some explanation as to why you no longer receive cards instead of you just not getting them.  


Okay, on with the cards for today.  I've got the two cards today that I made for both my Mother and my Mother in law, Judy.  This first card was made for Mama Judy.  I used my new Anna Griffin die cuts and embossing folders for this card.  I just love the way both of these cards turned out by the way.  I think the both of them are just great and I'm not one to sit around bragging about the projects that I make.  I just love the products that I got to use for these cards.  I started off with an Ivory card base of 5.5" x 6".  I used the fuax letterpress technique for the front of the card and I used my Hero Arts ink and placed it one the debossed side of the embossing folder and then ran it through the cuttlebug.  I then used my bundled sage green distress ink to color up a sheet of white card stock and then I used one of the dies from Anna and cut out the scroll/flourish piece.  I adhered it straight to the card front.  I also used the Hero Arts ink to color up the pink label and then die cut it using my Spellbinders die called, Fancy Tags Two.  I used a Studio G stamp set for the sentiment and used Hero Arts India Ink in black (love that ink).  I added some bling to the label and adhered it with foam dots.  I used that same piece of bundled sage green colored paper to die cut the boarder to go across the bottom half with the Anna dies and used the coordinating embossing folders for that.  I adhered it over a piece of gathered lace from my vintage stash. I then adhered a Prima flower and recollections leafs and some dew drops that I've been making from Pony Beads. (you can find videos in many places on You tube so I haven't done one). 


This is the card I made for my Mother.  I used some patterned paper by K & Co. for the background.  I die cut the top note label shape from a Sizzix die called Ornamental.  I stamped the image on the left side using a Hot off the Press stamp and used my Copic markers to color it in.  The sentiment stamp is by Hero Arts and the burlap trim is from Hobby Lobby.  I frayed the edges of that trim and cut off the wired edges.  I used to flower by The Paper Studio and a Recollections wooden owl that I also used Copic markers to color.  The heart is a die cut from Cricut. The bling is also from Recollections and on the background I used a metallic red Dollie cut down to size.  To finish the card I used dew drops that I made.

That is all for today.  Hope you enjoyed my Mother's Day cards.  I will be back tomorrow with another card. Hope to see you then.  Till then, I hope you have a wonderful day.  Much love and hugs, Amy k

Thursday, May 29, 2014

A Birthday for my Husband


This is the Birthday card I made for my wonderful, smart, and funny Husband this year in March.  I'm catching up on the blog post but it's taking some time.  Hey, at least I'm crafting, right?  lol. So, to make this card I first started with the 5.5 inch square corrugated card bases from Micheals. I added a piece of the red Bazzill basics card stock cut to fit the card base then I used patterned paper by Teresa Collins called Far and Away.  I cut the map paper a 1/4" smaller all around then inked the edges with distress ink.  I used another piece of the patterned paper in this kinda floral damask pattern and I used the cricut to cut out this note book shape from the Artiste cartridge from Close to My Heart. The two tag shapes are from the paper line on the cut apart sheet.  I inked all the edges with the same distress ink. I used some paper flowers from The Paper Studio by Hobby Lobby and added a bow that's wrapped around the note book shape die cut.  Then I just added the Happy Birthday sentiment and I'm unsure of the maker of that stamp.  Some of my stamps no longer have the paper work with them, sorry.  I'm sure I used Colorbox fluid chalk ink to stamp that out.  

Okay, that's all for today.  I want to thank you for taking the time to stop by today and check out my blog.  I hope, as always, that you find some inspiration.  I wish you all a happy and blessed day and I will be back tomorrow with another card.  See you then.  Much love and hugs, Amy k

Sunday, May 25, 2014

The cards I made this week for friends, family and my church family


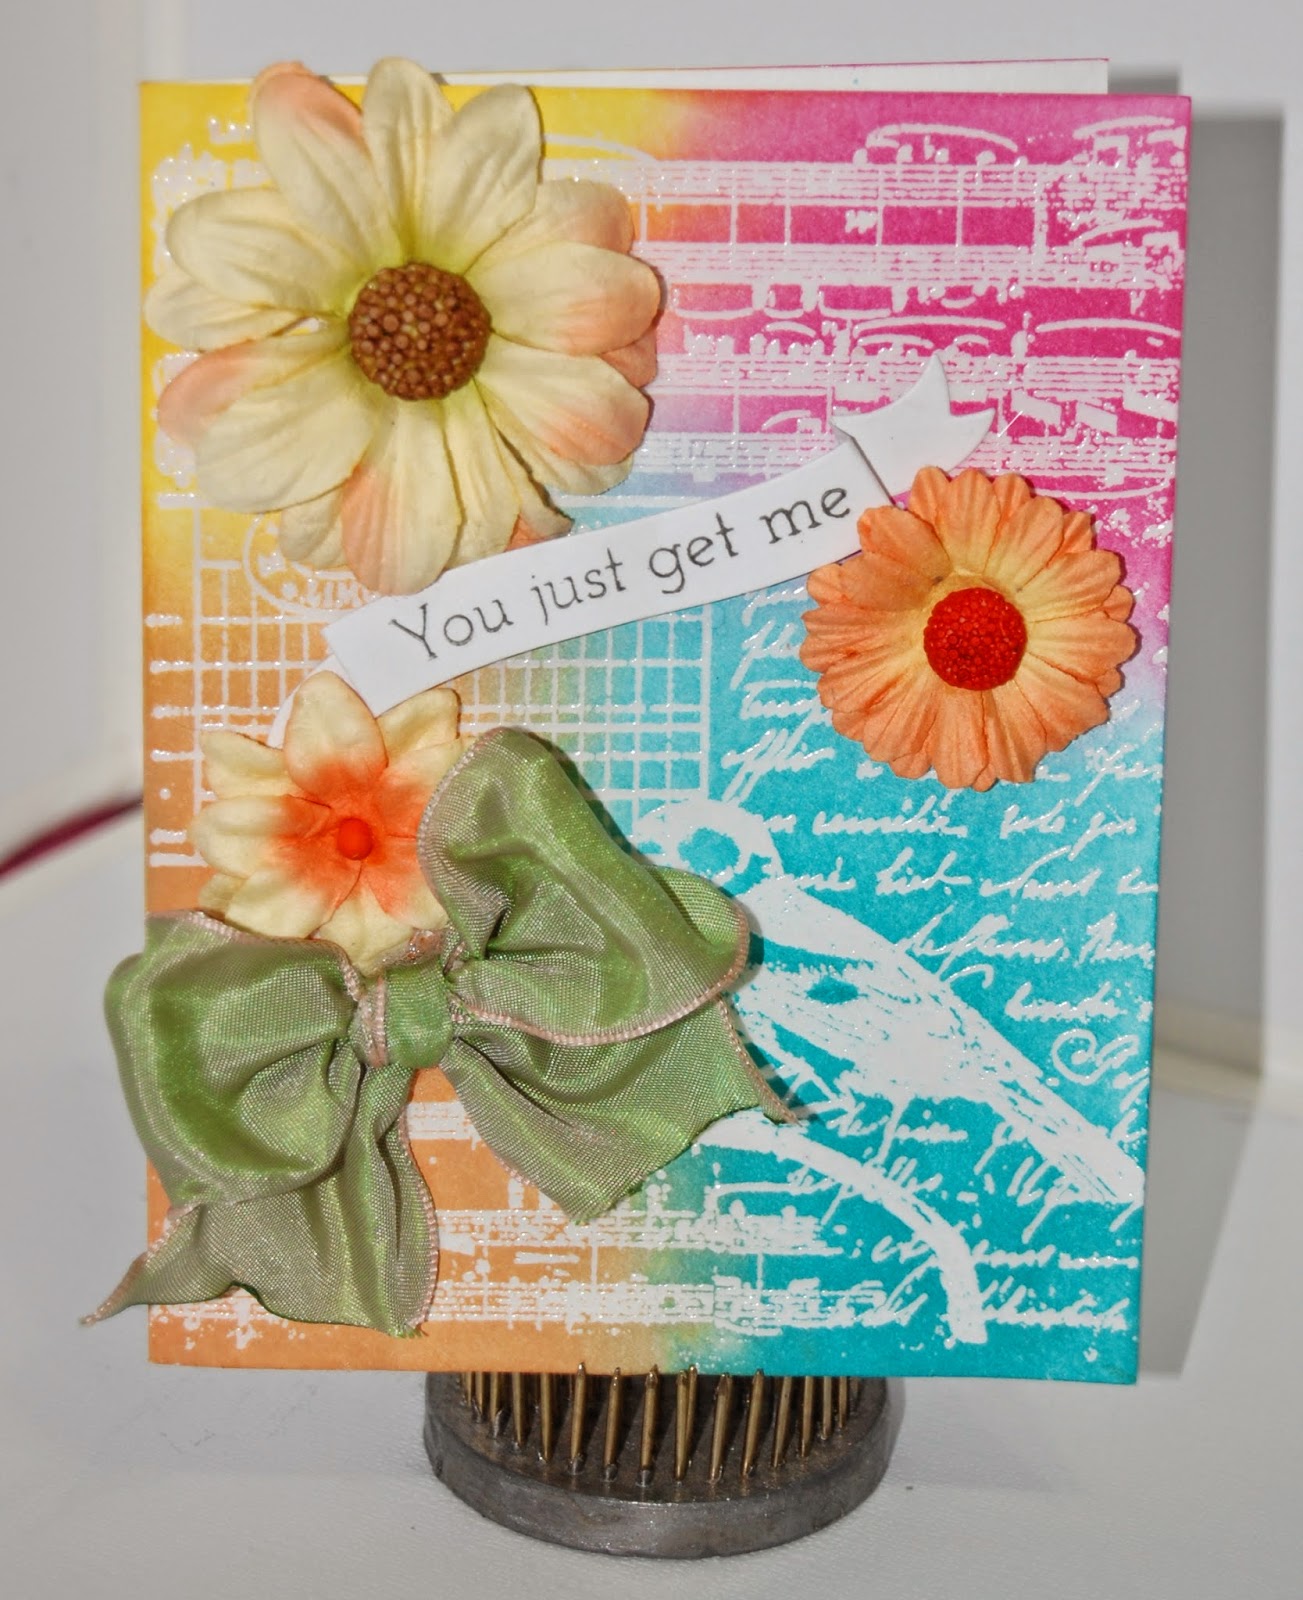
Anniversary card for my Husband


I just love it when I can make a card without relying on patterned paper.  Don't get me wrong, I love my pattern paper and I have a ton of it but sometimes it's nice to just to be able to rely on what you've learned in crafting to make the projects.  I mean, Come on guys, I challenge you to use just your techniques to make a project.  Sure it's beautiful to cover the front of your card with pattern paper but it's also the easy way to craft and you know it if you are really honest with your self.  I am guilty of it most of all.  I post cards all the time that have multiple pieces of patterned paper on them but sometimes I like to, so to say, get back to my roots and just use a technique or two to make my own beauty.  For this card I took a white  4.25 x.5.5" card base and first used my embossing powder bag to remove the oils and static from the card so that the embossing powder would only stick to the versa mark ink. So I took my stamp from Hero Arts and inked it up with the versa mark ink then stamped it down on the card base.  I then heat embossed it with clear embossing powder.  Then I picked my distress inks in four colors: salty ocean, picked raspberry, squeezed lemonade, and spiced marmalade. I used an ink blending tool to apply the distress ink to the card front.  The embossing powder will resist the ink and the card will remain white underneath.  Once you are done adding ink all you have to do is wipe the card base down with a dry towel to remove any excess distress ink.  The sentiment is from the Tilted banner sayings stamp set from Simon Says Stamp and the banner die also goes with that set and can be purchased separately.   I then just simply added some orange toned flowers from Recollections by Micheal's stores and made a bow out of some shimmery green wired ribbon I had in my stash.  I hope you enjoyed the card today and I hope you have a blessed and safe Memorial Day holiday. And I hope you all have a very Blessed Sunday. I've got to be off but I'll be back tomorrow with another card. (Still trying to play catch up). Talk to you soon, much love and hugs, amy k


Friday, May 23, 2014

Handmade Birthday card for my Briother


Those of you who know me well know that I only have one sibling and that's my wonderful, fully, sensitive, personable, lovable, and just all around wonderful kinda guy who is my Brother.  His name is Derek but I've pretty much always called him Brother. So don't get confused if I do so here, okay?  Brother and I have a special unspoken very tight bond.  We don't get to see one another near as much as I would like but he has two wonderful children and a loving wife to tend to and I have Brian to tend to, lol, just kidding. Well, No, not really. But anyway, as you know, sometimes life just gets in the way of us being able to get around to doing some of the things we just want to do because there are too many pressing matters that HAVE to be done.  But us being apart hasn't changed how much we love one another in the least.  I don't have to be told he loves me I see it in his eyes and feel it when he gives me a hug, EVERY time he greets me.  I told you he's wonderful, didn't I?  I want to make him a special card every year and each year I try.  I do think or at least I hope, that my card making improves every year so at least they are never the same. 

I made this card on a standard 4.25 x 5.5" card base and covered it with background paper by K & Co. from the "Life's Journey" collection. Yes, I know that's an old collection but I can't help it, I love the paper and I've bought and have like three of the 12 x 12 " paper pads and one of the "Ancestry" pads. LOVE that paper! I used some metallic gold card stock and my new Anna Griffin dies that I recently got from HSN. I got a bunch of dies and embossing folders and I've been loving making cards with those bad boys. lol. So, That corner piece and the scroll type flourish piece that runs behind the sentiment were cut from that gold card using Anna's dies. The die cut in the center from the 'news print' type paper (also from that K & Co. paper pad) is a Spellbinders die, it's called Labels 22. For the top note shape I just used Ga Pacific White card stock from good ole Wal Mart, I punched it out with an extra large punch from the Paper Studio which is made by Hobby Lobby. I distressed the edges of both the die cut and the punched top note shapes with distress ink from Tim Holtz for Ranger.  Sorry, I am unsure about what the color was..  There is also a piece from the K & Co. die cut ephemera shapes in the left of the spellbinders die cut.  For the sentiment I used a stamp set from Close to My Heart called  "Just a Number". It's one of those inside and  out sets. The banner die cut and sentiment is from Simon Says Stamp. I kinda made it read funny but it's supposed to read like this: "Inside every older person is a younger person..... (and Inside) wondering what happened." but it made it read crazy when I put that "wishing you the best" right square in the middle of it all. lol Yeah, I still have those moments.


Here's a picture of the inside just showing the rest of the sentiment. I used that same distress ink on it and punched it from an ek success punch.  One more thing, I've found this wonderful new black ink that I'm loving.  It's from Hero Arts and its India ink black. Love it! Stamps like a dream.

That's all for today, hope you enjoyed my card, Mistakes and all. I hope you have an wonderful day and thank you so much for taking the time to stop by my blog. I hope to see you back here again tomorrow for another card as I still have a few to go to get completely caught up. lol. Till then, I'll c u later. Hugs and love, Amy k

Thursday, May 22, 2014

Birthday Card for Nicole using a napkin technique


Nicole's birthday was back in mid April so that just goes to show you how far behind I still am on getting these cards posted but stick with me and I promise to get them all up soon!  This technique for making a card is nothing new altho you may not have seen it before.  I want you to know that I didn't think it up or come up with the idea myself.  I saw it done somewhere and thought it would make a great card and so here we are.  The great thing about making this card is you really need few supplies to get it done and make it look great.  I find these dinner size napkins at dollar stores everywhere.  I found this particular one at my local Tuesday Morning store. I cut the blue mat to size, The card is 5.5 x 5.5 so I believe I cut the mat at 5.25 x 5.25".  The next thing you need is white card stock if you want the color of the napkin to remain true.  You peel away the layers of the napkin and only use the printed top layer so when you apply it to your card stock whatever color you are using will show through.  The napkin becomes kinda translucent. I used gel medium to glue my napkin down but you could use mod podge or pretty much any of your favorite wet glue I suppose but I really only recommend these two.  You have to have edge to edge coverage and you need a glue that will stay wet long enough for you to get the napkin into place.  I will tell you that I made a boo boo when I was gluing down my napkin and instead of throwing it out and starting over I just decided to fix it and I will tell you what I did so that you can learn from my mistake.  Like I said, I was using gel medium and I don't have alot of experience using the stuff so I don't know if all of them are created equal. lol. I happened to be using some that was pretty thick and I don't know if that's just a characteristic of the medium or if you can get it in different thicknesses.  So I took my white card and I use a bigger size than what I need for the card base so that once the medium is dry I can use my trimmer and cut it down to the size needed.  So I was applying my medium and I got my napkin laid down and then the next step is to apply more gel medium over the top to seal it. Just like you would mod podge anything.  So when I was going over the top of the napkin with my medium I got a little heavy handed in the area right where the bird is.  I tore a great big gaping hole in my napkin I thought I had ruined it. but I stuck it down the best I could and let it dry.  While that was drying I took another napkin and removed the layers and then started fussy cutting out the bird.  Not so easy to do on something as thin as tissue paper. lol. But not to fear, I got it done. Once the gel medium on the napkin was dry I CAREFULLY added another layer of medium only to the area where the bird would be going and lay my bird right into place taking care to line up all the edges of the print so it looked seamless. Then I added my top layer of gel medium over the top of the bird only. Now, here's were my bad memory comes into play, I can't remember if I added the glitter to the gel medium or if I waited for that to dry and then added glue back to the bird area and then added glitter.  I think I used the glue but I'm sure you could do it either way but I'm thinking I used the glue because I had gotten the gel medium off the edges of the bird and I only wanted the glitter to stick to the bird.  So I added the glitter and let that dry and then used my enamel accents in black to dot in the eye and let that dry. Once it was all done and had dried over night I used my t square to square up the image and used the paper trimmer to cut the napkin covered card stock down to the proper size to fit the front of my card.  It's really a simple process if you don't have set backs like did and like I said, I could have just as easily tossed it and started over. Napkins are cheap and that's part of the beauty of this technique.  Ok, I'm going to hurry this blog post along and show you the inside of the card because you can obviously see how I just stamped a sentiment and punched it out and then added it with a silk flower I had in my stash. I did remove the plastic center of the flower and I added my own brad to the center. I also had some berry looking bits from a spray and I tucked them in under and around the flower. That finished off the front. and the sentiment is made by Unity stamp co.


For the inside of the card I cut another piece of that same blue card stock and layered it inside then I cut down a piece of white to fit inside the blue and I then took my Martha Stewart boarder punch to punch out the bottom edge. The sentiment was stamped on a separate piece of white card and I used Hero Arts ink but am unsure of the color and the stamp set is by Dylusions By Ranger inc. and the name of set is "say what you mean". I then cut out each line of the stamped sentiment and it comes with the boarder around the words so all I needed to do was cut it apart. The Happy Birthday was a sentiment from Hot off the Press and I'm unsure of the stamp set name but you can still find it in their current catalogs. I used some Powder Puff chalk ink in yellow to stamp that image.  Here's a crafty tip for those of you who are just learning about stamping.  All clear stamps are not created equal. You have just plain acrylic stamps and they are made by companies like Hot off the Press and Inkadinkado and tend to have a cheaper price point. Then you have Photopolimer stamps and they are the cream that rises to the top of the stamping world. lol.  I find them made by companies like Close to my Heart and Hero Arts and Paper Trey Ink and even Simon Says Stamp. Either of these kind of stamps will stick to an acrylic block and sometimes they are hard to tell apart but as you buy more stamps from different companies you will know to look for what they are made of and you will know by the pricing of each stamp set. I have even learned how to tell them apart by the "feel" of the stamp.  I really can't describe that to you but the main thing is the Photo stamps feel stickier. I know that sounds crazy but you will learn how to tell them apart.  Now I took the time to tell you all that to tell you this.  Not all inks will stick to and stamp well with your common acrylic stamps but I have found one kind of ink that does tend to stamp pretty well with all kinds of stamps and that is in particular Colorbox Fluid Chalk Inks.  I've found most other chalk inks pretty much will do a good job too with acrylic stamps but I really like either the colorbox or the powder puff. I know you can get reinkers for the colorbox and it comes in many many different colors, I am not sure if you can however, get reinkers for the powder puff inks. But, Hey, don't just take my word for it. go out and buy from lots of companies and find out what you like best and what works the best for you before you begin stocking up on their products. And don't ever, ever buy crafty supplies just because they are cheap.  If they are cheap and you know that they work great Perfect. I would say go for it..
I also wanted to show you the envelope I stamped for this card because it's kraft card and I wanted to show you how well the chalk inks stamped on it. So here's a picture of that now:

I used acrylic stamps for all these images and they come from lots of different companies. I used chalk ink for all the images and then I used my copic markers to color in the flowers and used my souffle pens to do the yellow centers.

That's all I have for today and I'm sorry that the post was SO long but if you hung in to the end you are a true champion and my crafty hat goes off to you my friend. Thank you all for stopping by and checking out my blog today and I hope you have a wonderful day today. I hope you learned something new today as well and if you liked (Or not) what you saw here leave me a comment. I love to hear your feed back. Lots of hugs, amyk