Welcome to Cards by Amy K.

I am SO GLAD you stopped by to check out my blog!!! Here I will be posting my current projects for you to see. PLEASE feel free to leave me a comment. I would LOVE to hear what you think about what I'm working on. I have been a scrapbooker/paper crafter since I first caught wind of this wonderful hobby in 2006. I am lucky enough to get to spend my days doing something I love so much and which brings so much joy into my life. I first started scrapbooking as a way to pass the time as I found myself at home alone all day suddenly, now I can't imagine life without it. Too bad I don't get paid for it, then I really would have it all!!!


Sunday, November 28, 2010

My swivel clasp for the swap hosted by emoradesigns

This picture shows all the charms laying out flat so you can better see each one of them. We were supposed to make at least 10 charms for the swivel clasp but as you can see, I used a lot more. In fact the swap was for the Tim Holtz swivel clasp to be completed with charms but I wanted my swivel clasp to be bright shiny silver and so I made my own. I also made mine to be a bit longer than the ones from Tim H. I hope my swap partner doesn't mind.

This picture shows the charms as they hang on the swivel clasp as a whole. I am sorry that the photos didn't turn out to be of the best quality but hopefully you can get a good idea of what it looked like. I really liked it and found it hard to stop adding charms to it.lol. I just wanted to keep adding more and more but it looks pretty full to me so I think maybe I picked the right time to stop. I liked the little Christmas light charms. I found them at wal mart. I tried to make the swivel clasp to have a combination of big and small charms on it. I like the long beaded charms but too many of them on one swivel clasp kinda looks off balance to me anyway. I tried to do a mixture of both. My swap partner said she liked the classic Christmas theme and I hope I was able to give her what she was looking for. I really hope she likes it. Thanks for stopping by and please feel free to leave me a comment. I love to hear from you guys.
Posted by Picasa

Friday, November 26, 2010

Happy Anniversary card


This card is for a couple of folks who really make me feel like they enjoy my cards. I mean, everyone that I send my cards to are always very thankful for them and they all tell me  how much they enjoy them.  It's just that a few people really seem to appreciate them and enjoy getting one of my cards more than others. I like to do special cards for these people. I hope this one falls into that category.
 I used the Paris Nights paper line from g.c.d. studios, and the "love... " stamp is from Autumn leaves. I used black embossing powder to emboss it. I made the flower out of Bazzill Basics Paper.  For the flower center I used a button,  removed the shank from the back and glued on a brad in it's place. The trim is from an unknown source, the sentiment is a rub on from making memories and its on a die cut from tags, bags, boxes and more for the cricut. I added some bling to match the button. I hope you enjoyed this card today.
Posted by Picasa

Thursday, November 25, 2010

More Christmas cards


These are my most recent attempts at finding the card that I will be making this year for Christmas. I thought I would put them up here and give you guys a chance to let me know what you think. Which one is your favorite? I think the last two are pretty much the ones that I'm leaning toward going with. I've changed paper stacks from the My Minds Eye stack that I started out with to an older Anna Griffin designer mat stack for the die cut images. I knew that I wanted to use the Cricut to do alot of the work on these cards for me so when I thought to use the patterned paper for a die cut image it seemed like a good fit. I thought that die cutting the patterned paper was a great way to bring the pattern into the card design. It's something more than just cutting your patterned paper into the regular square or rectangle shapes that we often fall back on in card designing, I like the smaller bow too. I really do like the plaid, wired ribbon but it would have really taken alot of it to make 40 cards. It was taking, on average, using about a foot per card so that would have been 40 feet of ribbon! I think the average roll of ribbon has about 6-9 feet on it. lol. I wasn't looking forward to buying that much ribbon or tying that many bows. lol. So, If you don't mind, leave me a comment and let me know which one is your favorite. We'll call them 1, 2, 3, & 4 starting at the top. I'd love to hear what you think. I'd also like to wish everyone a very Happy Thanksgiving today. Take the day to love and cherish the loved ones around you. They are precious know matter who they are to you. They love you enough to spend this special day with you and that is enough to make them special to you.=> "The human spirit needs places where nature has not been rearranged by the hand of man." anonymous.
Posted by Picasa

Saturday, November 20, 2010

This year's Christmas card? (maybe?)

I've been working on the design for what will be our Christmas card this year and this is one of the ideas that I've had so far. Now keep in mind that I've got to make almost 40 cards. Yep, 40. In the years past It's been 30 something but I'm quiet sure that it will be about 40 this year considering all the new friends that I've made online. I'm happy to make them every year. I love giving my handmade cards. I know you've heard me talk about this in the past but there are a few things that you must consider when you have to make multiples of a card. First, you must be mindful of the amount of supplies that you will need to complete many cards. If your design calls for an embellishment it must be one that is easily replicated. I like to keep it simple when designing these type cards. I like to use stamps because they don't run out and other supplies like ribbon and buttons and cricut cuts. I don't usually have to worry about not having enough of these supplies.

For this card that I've come up with, it uses mostly those type of supplies. There are a couple of things that I may change. For starters, the size of the card. This card is 5x7 and the problem with that is that when I went to purchase the Kraft card stock the only size I could find was 8.5x11. If I keep the card at the current size then I will only be able to get one card out of a piece of card stock. That's and important thing to consider. How much waste will making this many cards create? The other thing that I may change is the bow. As much as I like it and think it is an important element to the cards' design, it takes almost 12 inches of ribbon to make and if you do the math, that's 40 feet of ribbon! If I cant figure out how to make the bow with less ribbon then I will have to rethink using it. As far as the patterned paper goes, I'm not too concerned about all of the cards having the same one. I think that if you have a 12x12 stack that you like and want to make your cards from that It's fine to use different patterns. When you use one pad of paper they all usually have the same feel to them so they will probably all work with your design even if the pattern itself is different.

So, I hope this has helped you in making your own choices in making multiples of the same card. It's really not hard to make a lot cards once you get the first one done. After that first one it's all cake!
Hope you enjoy this card and have a happy Holiday season.
Posted by Picasa

Friday, November 12, 2010

Gift card holder

I made this gift card holder for my BFF, Wendy. She's the cheer leading coach for the pee wee cheerleaders. I'm not sure if that's what they are called technically..Pee wee? Its just what they remind me of. All 20 + or - one or two, girls got a gift certificate to Wal mart. Knowing that they card holders would probably get tossed after they removed the card, we decided to keep the design simple. Wendy and I worked on them together and this is what we came up with. We used the Cindy loo cart. for the cricut to cut out the card holders and then just layered the silver holographic paper with red bazzill and gp white that we stamped with an alpha stamp set from close to my heart with black soot distress ink from ranger. Hope you enjoy and, as always, thanks for stopping by.
Posted by Picasa

Thursday, November 11, 2010

Happy Veterans Day!!!


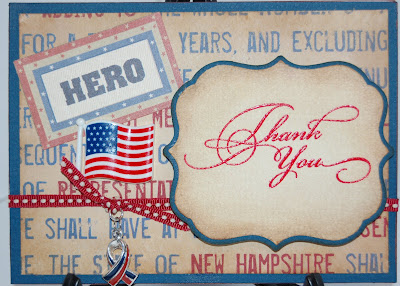
Every year I make a Happy Veterans day card for my hubby, Brian. He is a Veteran of a foreign war and I am very proud of him and the time he served in the Marine corps. So this year I made this card for him to show my thanks for his selfless service to his country. Thank You Baby, you and your service will never be forgotten.
I used some K & co. papers and die cuts, the sentiment is a stamp from close to my heart that I embossed with red embossing powder from Ranger. It's stamped on a label cut from the lacy labels cartridge for the cricut. I also added a flag button that I cut the back from and a ribbon charm. I also used distress ink to alter the color of the paper and on the label.
That's all for my Veteran's Day card. I hope that you will tell a Veteran that you know, "thank you" today too.
Posted by Picasa

Wednesday, November 10, 2010

More pictures from Berry College


The campus is HUGE and it has a complete working dairy farm and lots more. We didn't go all over the campus, I don't think we could have in just an hour or two. It's got tons of trails thru the wooded campus for hiking and biking. This bottom picture is of the island. They have a ton of wild life including ducks, swans and deer. It was so beautiful to just walk around out there. Hope you enjoy these pictures.
Posted by Picasa

Trip to Berry College

Brian and I took a trip out to Berry College campus, which is right near our home, and took these pictures of the water wheel. Its an old grain mill that was once used by the college. Built in 1930, it's one of the largest in the world and was used to grind corn into meal and grits. It's still fully operational and is now used on special occasions. It's so very beautiful up there on the mountain side this time of year
Posted by Picasa

Saturday, November 6, 2010

Grrrrrrr!

I just had to share this photo with you all though it's not a paper craft subject matter. I came across this pic while pulling pics off the pc to print for scrapbooking and I thought you guys might enjoy it. As those of you who know me well know, I also enjoy photography along with scrapbooking and I took this picture of Kit Kat back in the summer at about 2-3 months old. I love this picture because it shows the true nature of the cat, "always pawing at something", lol. Anyway, I hope it makes you smile today,=> enjoy.
Posted by Picasa

Thursday, November 4, 2010

Get well card for Wendy


My friend, Wendy, is recovering from surgery she had on Monday. I wanted to make her a card to let her know that I was thinking of her and wishing her a speedy recovery. Wendy is currently learning about scrap booking and paper crafting in general and is also my best friend. So that just rocks for me! To have my best friend have an interest in and want to participate in the same hobby as me! Woo hoo!! I love it. So I can't ever pass on the opportunity to make her something crafty. Hope you enjoy it, Wendy and I love you girl. Get to feeling better soon.
Im also entering this card into a challenge hosted by Sandy over at Sandy's Space.  She's got some  wonderful g.c.d. studio goodies up for grabs.  I'm entering on the home girl frame and the insperation is the paper line, homespun chic.  So go over to Sandy's blog and check out the challenge. http://angsandy.blogspot.com/2010/11/sandys-challenge-1.html
Now for the details... I used the Melody Ross Homespun Chic, paper pad from g.c.d. studios for the background. I used the dress form stamp from the girl's paperie's paper girl stamp set. The flowers are from Recollections; the Boutique Fleur. I get them at Michael's. The sentiment stamp is from Close to my Heart. Its from the Say it in style stamp set. I used chalk ink from Clearsnap in Charcoal for both stamps and the bookplate label is a Cricut cut from the Fabulous Finds cartridge. I added some crystals for a touch of bling and that's it for this card. Hope you enjoyed it! thanks for stopping by.
Posted by Picasa